
Glazing Repair Tips
Making sure that doors and windows are in good condition is among the most important parts of maintaining your building. Repairs to glazing are a significant responsibility for any glass company. They have to work in heights with large panes and follow strict protocol.
The seal that holds the two panes of glass together can break which causes water or moisture to accumulate in double-glazed windows. This can be repaired by reglazing.
Cracked or chipped panes
A cracked or chipped window pane isn't just ugly, but it could also leave your home vulnerable to elements. While it's not possible to stop cracks from occurring but you can take steps to slow down their spread and prolong the life of your windows.
Make use of a strong-hold adhesive tape to hold a crack in place. This is one of the most effective and efficient methods to stop it from becoming worse. Masking tape or packing tap can be able to fix superficial cracks, such as stress cracks that are caused by cold temperatures which cause glass to expand and shrink. For more severe cracks, it is possible to increase the amount of tape. Each piece should extend over the edges of the window on both sides.
Nail polish is also an option for those who want an easier solution. Clear nail polish is a good choice because it has adhesive properties to stop the crack from spreading and seal the crack, preventing moisture from escaping or entering your home. However, this type repair isn't going to last long and may need to be reapplied frequently.
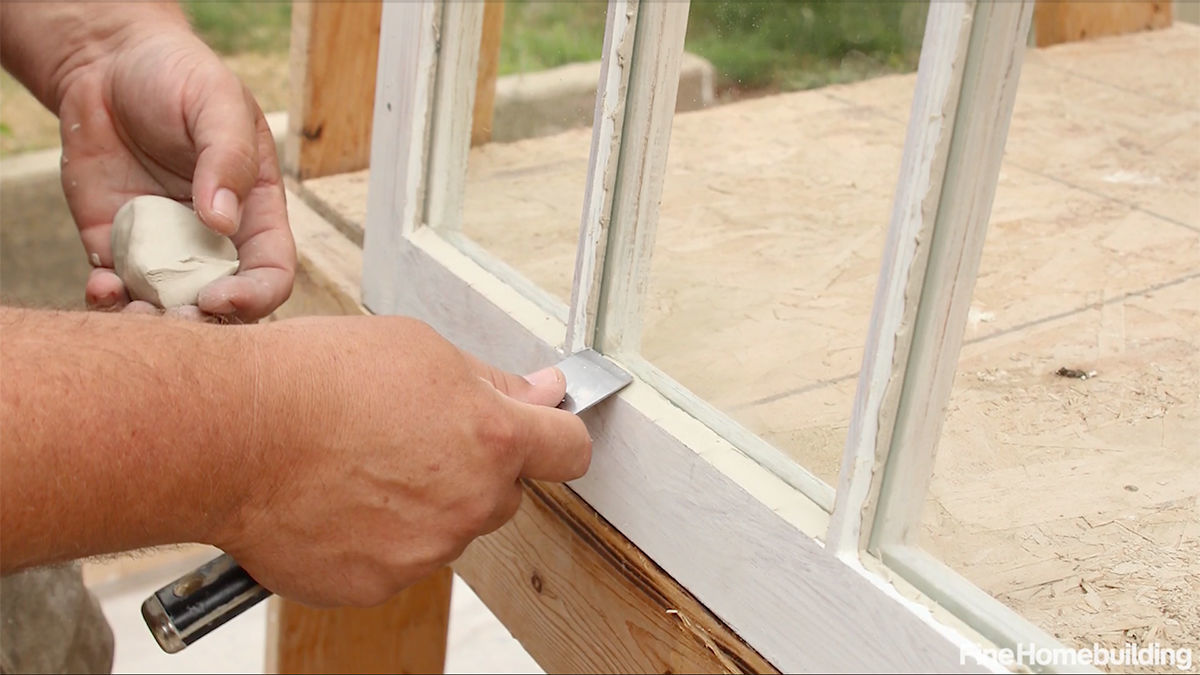
Epoxy is much more durable than other options for repairing damaged glass. Begin by cleaning the affected area using soap and water to remove any debris or shattered pieces of glass. Wear protective gloves and safety goggles to prepare the work area. Remove the sash from your window, if needed (newer casement windows come with release catches that make this process easier).
Mix equal parts of hardener and epoxy in a dish that is disposable or in an area with a good air circulation. Apply the epoxy mix using a putty knife, but be cautious not to apply too much pressure. Let the epoxy mixture sit for 10 minutes before removing any excess using a razor blade or a clean rag soaked in Acetone.
Depending on how well you did your repair and how often the window gets damaged, it could last years before it needs to be repaired. If you see signs of wear or tear, or when the crack becomes larger, you should replace your windows made of glass.
Leaking Windows
If you have leaking windows It is crucial to take action immediately. The water that seeps through windows can cause wood rot, mould growth, and many other problems that could damage your home and impact your health. There are a variety of ways to fix windows that leak, which can keep your home warm and secure.
Many window leaks are the result of aging or worn sealant. When the glazing putty that holds the window in place dries out, it leaves gaps around the frame which can allow water and cold air to enter your home. The best way to repair this problem is to recoat the sealant with a new bead of caulk. Make use of waterproof caulk to avoid water leaks and to combat moisture.
Poor installation is a common cause of leaky windows. This can include flashing that's vulnerable to water or nails that don't resist corrosion. In these cases it might be necessary to replace the window entirely.
Leaking windows can also indicate it's time to upgrade to high-efficiency vinyl. They are more energy efficient than older windows, and will lower your cooling and heating bills.
It is often difficult to pinpoint the cause of a window that is leaky. Check the surrounding walls for signs of water stains. These stains can be an indication that moisture has made its way into the wall cavity. This could cause issues with furniture and flooring.
Emergency Glazier hastings repairmywindowsanddoors can help you determine the source of the leak. They'll be able inspect the entire construction of the window and the wall to identify the problem. This is a complicated procedure, but it's also the most thorough method. A professional can remove any damaged wood from the frame of the window and the wall that surrounds it, then replace the material with new materials in order to prevent the possibility of leaks in the future. They can even perform the full replacement of the frame that is a more involved approach that involves taking out the old window, and then installing a new one from the ground up.
Missing Sealant Beads
A common issue is the absence of sealant beads around joints and corners. The absence of beads can cause water to enter the glass and glazing pockets. These gaps can be fixed by using silicone caulk that is gun-grade application. Ensure that you have the right caulking tool and enough sealant to complete the project. Make sure to utilize denatured alcohol to clean the area and eliminate any residue or debris that may interfere with the new sealant adhering to the substrate. To test the compatibility and adhesion, mock-ups must be made using the sealant.
Place a tube of silicone sealant into the caulking tool. Squeeze the trigger and sealant will begin to flow out. If you need to, cut the end of the application tube to make it larger. To feel the sealant, place a bead on scrap wood. After placing a bead onto the surface, smooth it using a painter's edge tool (or your finger if have a water-soaked soapy finger). Be sure to not drag the tool multiple directions over the silicone beads.
Low Energy Efficiency
High energy-efficiency glazing significantly reduces the amount of heat emitted from homes, allowing you to reduce energy costs. It also helps in reducing sounds from outside, creating an environment that is more peaceful.
The best method to maintain the efficiency of your windows is by keeping them free of paint stains. This can be done by using solvents or paint thinners. Always ensure the area is well ventilated as certain chemicals can release powerful fumes. Test the substance first on a small piece of glass to determine if it's safe for use.
If you notice visible paint stains on your window panes begin by covering the nearby surfaces with drop cloths or plastic sheets. This will protect the area from paint splatters as well as other damage that may occur during the removal process. The next step is to soak the surface with the cleaner. The surface will soften and make it easier for you to remove the stain from the paint. You can use a plastic scraper or a putty knife, however, you should not apply too much force since it could scratch the window's surface.
It is essential to speak with the conservation officer of your local council before making any modifications to your windows If you reside in an area that is designated a conservation area or a building that is listed. They can provide advice on non-intrusive methods to increase the efficiency of energy use in a property.